This picture is the first one you will see when you visit Anne's blog: http://ateljelillahjartat.blogspot.nl/
It is a favorite scene to me: beautiful in its calmness and simplicity. Nothing overdone or "just too much". And I really admire Anne's crochetwork....in the picture you can see she has used lovely colours to crochet some baskets.
Some time ago I won one of Anne's selfmade Pelargoniums. A very pretty pink one. (thank you so much, Anne!). But when I received her parcel I opened it and although she had wrapped it very carefully, the terracotta pot was broken! Fortunately her precious flower was undamaged.....
I decided to make a new pot myself, inspired on and dedicated to Anne's lovely crochetwork.....
However; to crochet a long string is as far as my own crochet-skills reach, so I had to satisfy myself with it.
In this post I will show you how I made a tiny basket myself using a crocheted thread.
Perhaps most of you will already know the technique I used. Those people can scroll directly down to the last picture :D
 |
| These are the materials I started out with. |
 |
| I covered a tiny bottle with plastic foil and a piece of wet fabric on top ot it. |
 |
| Pull the fabric tight with help of a piece of rubber. |
 |
| Glue one end of the thread on top of the bottle. Let it dry. |
 |
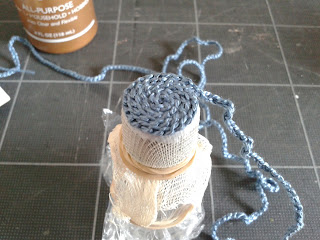
| Start glueing the rest of the thread. |
 |
| Now the bottom of the basket is finished.... |
 |
| Here the basket is all done. |
 |
| In this picture I show a different basket , but the idea is the same: just remove the plastic foil. |
 |
| After removing the plastic foil, cut away the excess fabric |
 |
| Paint the pot inside. (I made a few of them, red and blue) |
 |
| Add a string on top of the basket. |
 |
| I wrapped the remains of the old pot using a cotton thread and Tacky Glue |
 |
| I covered the outside in Tacky Glue and dipped it in a mix of dried coffee and tea. In this way the Pelargonium can be "repotted" whenever I like it! |
 |
| So this is the Pelargonium in the blue basket.... |
 |
| ...and in the red basket. |
