22/02/2017

Dressing table in the attic


Still working on my Miniature House, rather quietly......reaching completion slowly....

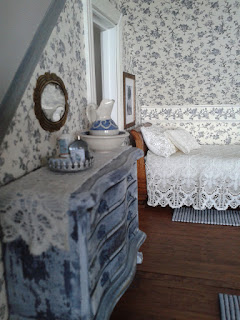
I have another corner in my 1:12 house that feels like there's nothing to add anymore; it's in the "blue attic".   To start with I bought a wooden piece of furniture and painted it.


Next I made two suitcases out of foamboard, fabric, wire and strips of painted paper.


I added a tiny pile of "lace and linen", held together with a ribbon.


To make things complete, I cut a piece of mirror-sheet, aged it 
and glued it into a kind of metal embellishment I bought.

Next I made two pieces handsoap (if you like to know how: http://michaelas-miniaturen.beeplog.de/151819_480971.htm)

Finally placing a lovely watering can from Elisabeth Causeret on top of the dressing table.

And here it is.....another step taken in decorating my doll's house.


To my fellow bloggers I would like to say; it's a bit more quiet in "Blog-land"  than it used to be,
but I am happy you are still updating your blogs.
For I visit them as much as I can and your posts keep me inspired.
My thanks to all of you!

20/12/2016

Umbrella Stand


After having made some umbrella's (http://liduina88.blogspot.nl/2016/10/umbrella.html)
 I turned my attention to making walking sticks.

And then of course an umbrella stand to put them in :-D


Guess what...Miniature House will have it's fifteen minutes of fame in the next issue of
Dutch Doll's House Magazine : "Poppenhuizen & Miniaturen"


12/10/2016

Umbrella

 
I found a really helpful tutorial on making umbrella's: http://wasting-gold-paper.blogspot.nl/2013/03/easy-parasolumbrella-tutorial.html.
So I practiced a little and made a few myself.
One day I'll put some of them in the downstairs hall of my Miniature House.....


10/09/2016

A touch of Chinese to the attic


Actually, it all started with this little chinese teapot I found in a shop years ago.
I decided to create a kind of "chinese corner" in my attic.
So I made a tiny sidetable to place the teapot on.


I next changed a readymade chair so it would be more in harmony with the teapot&table.
You can see the way the chair used to look like
in the picture below, though I used one with armrests of course :-)


Adding a picture and perhaps in future more things....
But for now I think it's okay like this.


Rember the washstand I made long ago?
(http://liduina88.blogspot.nl/2013/02/cupboard-for-attic.html)
I suppose some readers will be dissapointed now, but I simply painted it over,
in order to have it fit into the rest of the room ;-)


Right now, this is how the attic looks like:


13/08/2016

Chimneys


When I assembled my dollhouse kit "De Cameleon"  from Karweipost back in 2007
just one chimney (the square one on the roof at the back of the house) was part of the design.


However, I wanted a hearth in almost every room of the house,
so I added another chimney to the right hand side of it.


I later improved the top of the chimneys.

The one at the back of the roof got a better top
by adding some paper covered by plaster.


To enhance the one on the side of the house,
I made some pipes out of wood and paper, stained them
and glued them in place on a layer of plaster.


And this is how the roof looks right now....


03/08/2016

Sewing Room is finished!


Somehow, the sewing room has become the second room in my
Miniature House I regard "finished". ( First one was the bathroom, see my post   http://liduina88.blogspot.nl/2013/08/bathroom.html)

I changed my mind and placed the table with the sewing machine on top of it,
 in front of the window.

I collected all accessories I had made before and started shifting them around,
arranging them untill I felt happy about it. 


23/07/2016

Sewing Room


Next to the bathroom in my Miniature House a deep but narrow space was left in which a cupboard could be placed, but not much more than that.
I decided this would become a place to sew and mend clothes. 
So I bought a cupboard, a chair, a  mannequin and a sewing machine.


I changed the chair I bought and made a table to put the sewing machine on.
Together with the cupboard I painted all pieces in the same colour.


I then started dressing the mannequin. I always stiffen fabric by using "Paverpol".


 When this was finished I thought it would be nice to add a mirror....


That done, I made the accessories and a small table to exhibit them.
The sewing machine will be placed in front of the bathroom in future.....